
Three years ago, my oldest son and I went to visit the Philippines. It was my son’s first time going after 17 years. He was just 6 years old when we came to Canada, so he was quite excited to see his uncles, aunts and cousins. Our relatives took turns taking us to shopping malls and restaurants. Being both food enthusiasts, my son and I tried every Filipino food that we could possibly eat. One of the many things we had tried was ensaymada.
Ensaymada is one of the favorite breakfast or snack of most Filipinos. It can be bought anywhere from a stall in the mall, in a bakeshop or even at a fast food court. I have tried several times to make ensaymadas. This recipe is the closest to the store bought ensaymadas that I always have for snack. I am really proud and satisfied with how it turned out. My husband was commenting on how the smell of the freshly baked ensaymadas makes him hungry. It is best eaten when it’s freshly baked but still good the next day, just warm it up for 20-30 seconds in the microwave. And I am pretty sure, just like my husband and oldest son, you won’t be able to eat just one 🙂
Cooking Tips for Perfect Ensaymada
To achieve the perfect texture for your ensaymada, make sure to knead the dough well. This helps develop the gluten, giving the bread its fluffy, airy quality. A stand mixer can be a huge help here, but if you prefer to knead by hand, aim for about 10 minutes of good, solid kneading. Allow the dough to rise in a warm place until it doubles in size. If your kitchen is cool, preheat your oven to the lowest setting for a few minutes, then turn it off and place the dough inside. This creates a cozy environment for rising. Finally, brush the tops with butter before baking for that golden finish.
Storage Instructions and Variations
Once your ensaymadas have cooled, store them in an airtight container at room temperature if you plan to eat them within a couple of days. For longer storage, consider freezing them. Wrap each ensaymada tightly in plastic wrap and place them in a freezer-safe bag. They can last up to three months in the freezer. If you want to switch things up, try adding different toppings. Grated cheese is a classic, but you could also use a sprinkle of powdered sugar or even a drizzle of caramel for a sweet twist. Adding some ube or pandan flavoring to the dough can also create a unique flair.
Frequently Asked Questions
What can I use instead of evaporated milk?
If you don’t have evaporated milk on hand, you can substitute it with whole milk or even a mix of milk and cream for a richer flavor. Just keep in mind that the texture might be slightly different.
How should I store leftover ensaymada?
Store your leftover ensaymada in an airtight container at room temperature for up to two days. If you want to keep them longer, pop them in the fridge or freeze them for future snacks.
Can I make the dough ahead of time?
Yes, you can prepare the dough in advance. Just make sure to let it rise first, then shape it into rolls and place them in the fridge overnight, allowing them to rise again before baking.
What should I serve with ensaymada?
Ensaymada is great on its own, but pairing it with a hot cup of coffee or tea really elevates the experience. You can also serve it with some butter or a sprinkle of powdered sugar on top for extra sweetness.
What are some common mistakes to avoid?
One common mistake is not kneading the dough enough, which can lead to a dense texture. Also, make sure your yeast is active by proofing it in warm water with sugar before adding it to the mix.
Cheese Ensaymada (Filipino Style Brioche)
Ingredients
- 1 tablespoon active dry yeast
- 1 tablespoon sugar
- ½ cup lukewarm water
- 4 egg yolks
- ½ cup sugar
- ¼ cup evaporated milk
- ½ teaspoon salt
- ½ cup melted unsalted butter
- 3 cups all-purpose flour
- 2 1/2-3 cups grated cheddar cheese
Instructions
- Line a cookie sheet with parchment paper. Set aside.
- Dissolve yeast and sugar in a small amount of lukewarm water. Set aside.
- In a mixing bowl, combine the egg yolks, sugar, milk, salt, ¼ cup melted butter, remaining water and 1 ½ cups flour to form a sponge dough.
- Stir in yeast mixture. Add the rest of the flour (1 ½ cups) and remaining butter (1/4 cup) then transfer the dough on a floured board.
- Knead dough until smooth and blisters appear (around 5-10 minutes). Transfer the dough in a greased bowl; cover with plastic wrap and let rise for 2 hours or until double in size.
- Punch down the dough and divide it into 15 pieces, each piece weighing approximately 2 oz.
- Form each piece into a ball and using a rolling pin, roll out thinly into a 5X4 inch rectangle. Brushed the surface with creamed butter and sprinkle with grated cheese. Roll as in jelly roll and form into a coil.
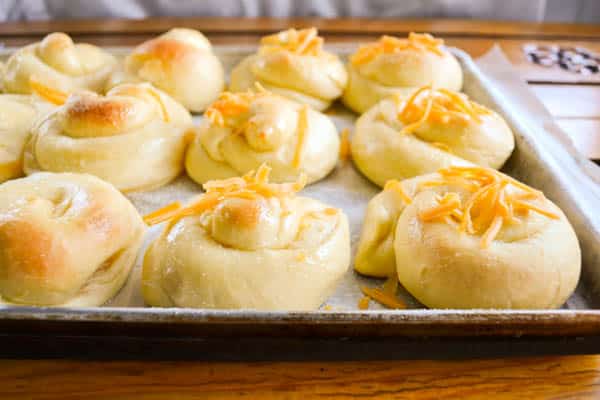
- Place in prepared cookie sheet, brush top of each ensaymada with melted butter and let rise for 4 hours or until double in size. (The longer you let it rise, the softer the ensaymada would be)
- Bake in a preheated 350° F oven for 10-15 minutes or until light golden brown (depends on the oven). Immediately brush the top of ensaymada with melted butter and let cool slightly.
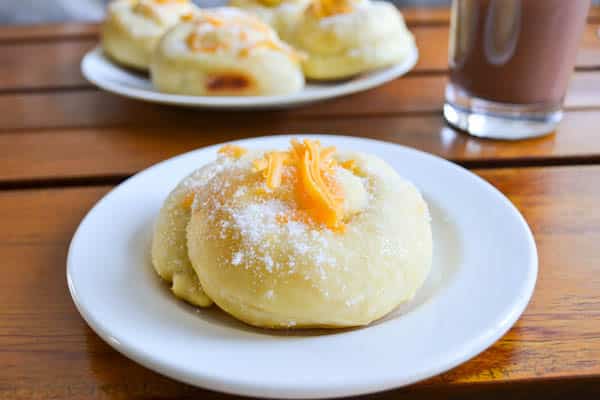
- Before serving, top with creamed butter, sugar and grated cheese.
- Enjoy!
Notes
Nutrition
I use All Purpose Flour, why its hard when done?
Hi Lerma,
I don’t know what happened. One suggestion I can make is to give more time for the dough to rise. Please see step 8. Hope this helps!
Thank you for this recipe. I was able to have the memories of eating fresh ensamada here in Canada. My ensamadas turned out soooo gooood. My only recommendations are to include the creamed butter in the list of ingredients as I winged it. 1/3 cup of creamed unsalted butter is what I used. Also if you can recommend how much cheese to put on before rolling. I think I used 1 cup of shredded velveeta cheese as I thought it would taste more authentic but I think the quantity was too much much, more so, if someone used medium cheddar cheese. Maybe suggest to sprinkle sparsely like about 1/2 tbsp per roll. Either than that mine turned out great that we ate so many before I even put the butter and sugar on top. Thank you for sharing!